
or less away, add the undersill trim to lock it in place (shown). 2. This piece should be applied directly to the wall sheathing using roofing nails. It must go under the window nailing fin and lap over the nailing hem of the vinyl siding (Photo 3). The purpose of the drip cap flashing is to protect and cover the joint above the trim edge. (Must Read)Continue, It is always a bad idea to begin a roofing project without first estimating the costs. We are no longer supporting IE (Internet Explorer) as we strive to provide site experiences for browsers that support new web standards and security practices. Retrofit: 2009, 2012, 2015, 2018, and 2021 IRC, Section R102.7.1 Additions, alterations, or repairs. The vinyl must be free to expand and contract. Drive roofing nails at each corner to secure it. What Are The Most Durable Hardwood Floors For Pets? Best practice with any wood or fiber-cement siding calls for building a rain screen assembly. This is a design detail that must be worked out before the foundation is poured. Section R703.8.6 Weepholes. Footnote 10)These Items not required for existing structural masonry walls (e.g., in a home undergoing a gut rehabilitation). Most manufacturers offer complete instructions; ask for them wherever vinyl siding is sold. Most housewraps are not sufficient for ground contact, and hopefully your sheathing below ground is protected with a waterproofing foundation membrane (there are many types). For a successful base flashing retrofit, the extent of the removal of the existing cladding need only be whatever is sufficient to strip-in the new metal or rigid plastic flashing with the water control layer behind the cladding (see Scope). Builders and subcontractors should follow a protocol for water management details in exterior wallssuch as the ENERGY STAR Single-Family New Homes Water Management System Builder Checklist. Weepholes must be provided in the outside wythe of masonry walls at maximum spacing of 33 inches on center and must be located directly above the flashing. The U.S. Environmental Protection Agency. The flashing must include a drip-edge to direct any water that runs down the drainage plane away from the bottom of the wall. When the weep screed attaches to plywood, OSB, or another wood-based framing material, a self-adhesive flashing membrane is needed first to protect the wood from water draining through the perforated screed (, Weep screed. This helps to stop mortar droppings from clogging the weep holes (, Weep holes. A roof repair or remodel may require a roof retro flash instead. The Importance of Kickout Flashing and Other Flashing (https://youtu.be/V1KCaNuxO68), Can You Replace Flashing Without Damaging Shingles? 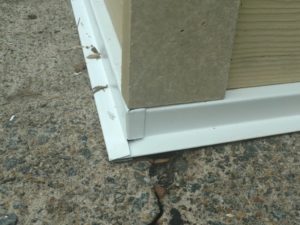 26 galvanized sheet gage), corrosion-resistant weep screed or plastic weep screed, with a minimum vertical attachment flange of 31/2 inches must be provided at or below the foundation plate line on exterior stud walls per ASTM C 926. So it may be a third story or dormer window situation that requires step flashing. Prime the ends of the clapboard cut out of the siding, and install a flashing drip cap underneath it. Alternate Flashing and Shingles. Through-wall flashing. There are basically two types of flashing. 11), National Water Management System Builder Requirements, 2. Critical spots like vertical surfaces and window trims, using head flashings. Cut out some step flashing pieces so they are two inches long and ten inches wider than the exposed shingles. ; In the long term, plywood used under siding can rot. wood), as long as the trim or stucco is lapped over the flange. If necessary, put a butt joint above the window to make it easier to install these final pieces. It covers the seam where those two building elements meet, Ojeda says. This way, you can insert the flashing in between. First, you will need to remove the old windows and measure the opening. through the middle of the slots. Be sure to leave the gap so moisture that collects behind the siding can escape. Marking the position of each piece before you remove it (Photo 2) will help you reposition the siding without stretching it. Next, you will need to cut the vinyl siding to fit the opening and nail it into place. It may seem a little impossible, but it is easy to do retro flashes. When you consider more difficult applications like installing flashing against chimneys, vents, plumbing boots, skylights, and other roofing features, it can get even more complex. Vinyl Siding Lights: How to Mount Lights Using a Vinyl Mounting Block, Flashing a Deck Ledger Board on Vinyl Siding, Siding Repair: Holes in Aluminum and Vinyl, How to Install Luxury Vinyl Plank Flooring, Refinish Hardwood Floors in One Day: How to Refinish Wood Floors Step by Step, We are no longer supporting IE (Internet Explorer), How to Get Cat Pee Out of Clothes and Its Smell Too, How to Deep-Clean Vinyl and Linoleum Floors, Vintage Family Handyman Project: Modernizing a Fireplace (Then and Now), Do not Sell or Share My Personal Information.
  The Building America Field Kit allows you to save items to your profile for review or use on-site. The bottom layer of building paper would be installed next, overlapping the vertical leg of the flashing. Metal will rust and is not recommended (. // Northface Construction (https://youtu.be/RpzEHMM2WkY), contact our team at Northface Construction, Pry bar to remove existing flashing or shingles. Slit the building paper about 2 in. Alkaline cement reacts to produce hydrogen gas. Cut through the nailing hem with shears, then score deeply along the rip line with a utility knife. 31: A Realtors Insights on Todays Turbulent Housing Market, Modern Living Room Design for a Mid-Century Home, Ask Danny | Ep. This space creates a capillary break, which prevents water that wicks through the siding from being absorbed into the water-resistive barrier. Any holes through the wall, such as for water spigots, exhaust vent outlets, HVAC line sets, or wiring for outdoor light fixtures and receptacles, should be carefully sealed or gasketed. The specific materials and installation methods depend on the cladding used on the building. Nail the siding, stopping before placing the final nail at the end. *** As an Amazon Associate I earn from qualifying purchases. Wind pressure and capillary action can drive rainwater through the many cracks, joints, and small gaps in a building's exterior. Follow this simple step-by-step process for installing lap siding with pan flashing at butt joints.
  Professionally Installed Wall Water Protection. Yes!
  Despite the importance of flashing, some roofers re-use flashing and other roof components. Base flashing. Place your first shingle, so it sits over your starter strip, and the kickout flashing and secure with roofing cement and a couple of nails. Mark out a notch 1 in. How to Construct a Drainable Wall Assembly with a Rain Screen Air Gap for Wood or Fiber-Cement Siding. The process requires thorough knowledge and careful execution to make sure that everything is properly done. Nail it to the sidewall (or glue it if nailing isnt possible). This technique uses all the same water management details of a drainable wall assembly, but adds an air space behind the siding. The best way to retro flash a roof with wood siding is to flash the roof wall intersection by cutting out a groove in the siding. Do You Overlap Drip Edge?
  Required fields are marked *.
  Video from Home Innovation Research Labs on installing a stone veneer exterior with an internal drainage plane to protect the home from moisture issues. A minimum 0.019-inch (No. It is necessary to keep the fasteners away from the step flashing. However, while these shortfalls will lead to water getting through the surface, the water can be managed. Especially of the siding and flashing. The first course of the WRB needs to overlap the vertical leg of the base flashing. The size, however, may vary depending on the siding. Dont drive them tight. Corner flashing is commonly used around walls or dormers that protrude from the top of the roof. Sometimes you can unzip it just with your fingers. 2009 International Residential Code (IRC). Appendix J regulates the repair, renovation, alteration, and reconstruction of existing buildings and is intended to encourage their continued safe use. Look to the existing pattern of staining and damage for an indication of where to repoint. In the end, your flashing should be covered halfway by shingles, and the other half will be covered by your siding. Please see theENERGY STAR Single-Family New Homes Implementation Timelinefor the program version and revision currently applicable in your state. Install the piece of lap siding, following one of the recommended nailing methods. Drive a nail through your chosen starting height and snap a chalk line around the entire perimeter of your house. out from the wall. There's never a convenient time for your roof to develop a leak. Your email address will not be published.
  How To Install Horizontal Flashing James Hardie 13K subscribers Subscribe 14K views 5 years ago Better Building Practices - Wall Working around exterior windows can be tricky. The size of the screed will depend on the stucco thickness, with traditional three-coat stucco requiring a deeper profile than the screed needed for a one coat system. It is therefore advisable to contact a professional roofer for the installation of the flashings. Not only will we get the job done right, but we will ensure your roof is in top shape to protect your home from the elements. Especially for siding and concrete. Website detailing the state by state requirements for new home ENERGY STAR compliant construction. by 14-in. longer than the window width. (See Figure 3 in the Description tab for an illustration of the conceptual approach.). Known as a roofing material for redirecting rainwater away from the vulnerable parts of the roof and house, roof flashing is a thin and galvanized steel installed around roof features like skylights, vents, and chimneys. Most exterior wall cladding systems leak.
 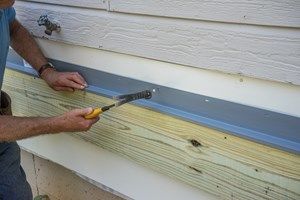 of flashing on the roof and 6 For the most part, skylights will come with their flashing much like a window might, but if not, roofers will install their own to ensure a tight seal. And you'll still get professional looking results. Hence, consider the weather before choosing your flashing. Lets dive into flashing strategies and how to install them. This is a 5-inch drop per 100 feet, or about 5/8-inch per foot (, Self-adhesive flashing. Your roofing material and preferences should be decisive for your type of flashing. Remember to provide a 3/8-inch gap between the flashing and the bottom edge of the siding. Locate the piece you want to remove and unlock the one above it with the zip tool (Photo 1 inset). Unfortunately, vinyl siding fades with age, so an exact color match may be impossible. You must have JavaScript enabled to use this form. Flashing may sometimes get bent and slope towards the wall as a result of the installation process. Bend the tab back and forth to snap it off (see Photo 8). Can You Tile Over Tile? Cut the siding with a curved saw, and avoid cutting the plywood behind the siding. We are in southern Ontario, Canada and the garage is built into a hill. Right A rigid rain screen product completely covers the wall behind the cladding and window framing. Retrofit existing exterior walls by adding base flashing to improve drainage, which mitigates water leaks and extends the life of the cladding. Cut and notch J-channel to fit over the top of the window. Be very careful while inserting it. We caught up with several team members at LP Building Solutions to get their takes on the upcoming year and how our products tie to key challenges, new building trends and more. The goal is to create a wall system that can manage the water that will inevitably get behind any cladding system. 2. Thinset can eventually lead to a damp wall. This path starts with the airspace behind the brick. Flashing can be installed alongside engineered wood lap siding using, A hand seamer (a siding brake is optional), LP SmartSide siding installation instructions. So, you need to install the appropriate flashing for these scenarios. Use a level to make sure the boards are plumb. Push one end of longer pieces into the trim, then bow the siding slightly and guide the other end into the trim. Draw a line on the wall along the top of each siding course before you pull the nails.
  We may receive compensation if you visit partners we recommend. So here are the steps to install the flashing against the side wall. WebWestern Red Cedar Siding General Installation Siding In this section Table of Contents Installing Flashing Corners and Field Joints Installing Flashing Flashing Installation Before installing siding, make sure that flashings are installed to prevent moisture from entering wall and roof spaces. Number each piece and set it aside. At the end of the retro flash, you would have a 3/4 inch air and drain space. Make sure to seal each layer with roofing caulk or sealant each step of the way to create a watertight seal. Type of plywood siding: T1-11 plywood siding is less expensive than other types due to its simple design. (Everything You Should Know)Continue, When it comes to finishing the walls of commercial and industrial buildings, its all about the tape. Brick claddings do not differ from other cladding systems in that the extent of the removal can be limited to only what is required to add the new flashing; however, this may be an excellent time to consider repointing the mortar at the base of the wall. Even if a builder succeeds in sealing a majority of the holes, using caulk on the exterior of the wall is not a long-term solution; the caulk will need to be reapplied fairly often. Learn how to avoid a common flashing under siding installation mistake! How To Install Wall Cabinets Without Studs: Complete Guide. Flashing can be installed alongside engineered wood lap siding using the following tools and materials: Some pieces of flashing, like Z-flashing, can be purchased off the shelf in certain measurements,. Remove the cut piece and install the step flashing. It is always recommended to install the step flashing against the wall behind the siding so that the fitting can cover the top of the flashing on the wall. By, buying Drip Cap and either installing it correctly and pulling the siding panel free for a complete re-do or by cutting the Drip Cap's back off to just slip it under the J-channel. Therefore, it is highly recommended you leave this work to the pros. Cut 45-degree miters in the side J-channel. It tends to split and collapse under, Read More Are Drywall Screws Good For MDF? With this approach, any water that leaks through the cladding will run into a water-resistant surface and safely drain down and out of the wall. These are critical to providing that safety net alongside any wall that is meeting a roof. We'll show you how to install it and make repairs. Remove siding until you expose enough wall to replace the window. Mitered corners give a clean and finished appearance. Flashing is arguably the most common solution for water damage. New vinyl siding is quite flexible, especially in warm weather, but older siding becomes more brittle with age, so work carefully. On the other hand, if you are familiar with roof flashing and want to give it a try fixing it, then heres a brief guide to help you. Finally, pull the last loose piece down and over the lock with the zip tool. Then, you can remove the nails from the nearest siding and slide the flashing under it. Dont let the fact that you have vinyl siding installation deter you from that repair or remodeling project. Building codes require that homes have drip edges to protect the roof components from possible water damage. Position the notched piece under the window, sliding it into the undersill trim and pushing the butt edge against the locking tab in the lower siding course to snap it in place. Heres the necessary information that you should know beforehand. This helps in directing the water downwards. Now, spare us some more minutes, we are almost at the end. When more than one length is needed to span across the bottom of a wall, overlap pieces at least 8 inches. Learn how to avoid a common. It must go under the window nailing fin and lap over the nailing hem of the vinyl siding (Photo 3). Ensure the ends of the siding are factory finished for this flashing method. It is brittle, and cracking is in its nature. It's a phrase that likely brings up a wide range of feelings for the average homeowner. When aluminum siding meets concrete, the effects depend on the ingredients of the cement. It either helps guide water into your gutters, or if you dont have gutters, it will ensure water flows away from your homes soffit and fascia, keeping it safe from water damage. How To Install Roof Flashing Against Wood Siding? Decide where you want the siding to begin, then install a starter strip. (Must Read), Cost Of Roofing A Three Bedroom House (Must Read), Steps to Install the Roof Flashing Against the Wood Siding. The width of the bottom flashing will vary. Drive nails (which will need to be longer than the board nails) through the gaps; avoid driving through the boards. Next, install a piece of lap siding. Should There Be a Gap Between Wood Siding and Roof? Ensure you extend the bottom edge of the flashing below the nail line. The zip tool slides under the siding to unlock it. We talked with Isaac Ojeda, Construction Service Associate at LP Building Solutions, to learn how to install flashing under siding and about some flashing and siding installation mistakes. First, you need to consider where the roof joins the wall. Whether you are replacing existing flashing or installing it new, you need a few basic tools and materials to get the job done right. Attach the flashing with exterior-grade caulk and galvanized or stainless steel nails, as per the manufacturers instructions. HousingHow Roofing How To Install Roof Flashing Against Wood Siding? The same problem applies when placing a roof flashing against siding too. Roof replacement. Flashing must be located beneath the first course of masonry above finished ground level above the foundation wall or slab and at other points of support, including structural floors, shelf angles and lintels when masonry veneers are designed per Section R703.7. First, apply sealant where the flashing would be and firmly seat it. Next, install a piece of lap siding. Roof flashing is essential in construction, so a poorly installed flashing can cause many problems, especially leaks. Lap it over the side flashing and window nailing fin. We had to cut the piece and put a joint directly above the window. It covers the seam where those two building elements meet, Ojeda says. You must be thinking about how to use flashing between siding and concrete? Roof flashing is used to ensure no water leaks into areas of roofing features like vents, chimneys, dormers, skylights, etc. Best Way to Retro Flash Roof Against the Wood Siding Wall? ; Cut the top J-channel 2 in. Then slide it up and snap the butt into the locking edge of the piece below.
  Slide 5-in. That being said, if you are a seasoned DIY enthusiast and you are looking for ways to repair a damaged roof flashing, this article could help you. Its a barrier to any water that may work its way behind the siding, so be sure upper pieces lap over lower ones. Buy a 10-in.wide roll of aluminum (at home centers), and cut it into 5-in.wide strips for the top and sides of the window. Roof flashing is not a one-method solution. Roof flashing can be installed in different ways as well. But dont worry my friend. Aluminum Decking Review: Is It Better Than Other Decking Materials? Wall venting behind brick and stone veneers is especially important. Its purpose is to protect the houses exterior from harsh weather conditions. The weather-resistant barrier must lap the attachment flange, and the exterior lath must cover and end on the weep screed attachment flange. However, if upon removal of the cladding, rotten sheathing is discovered, additional removal is recommended to remove and replace all rotten sheathing and mitigate the cause of the damage. Its installed behind the siding and underneath the roofing material. WebHeres how to install flashing under siding: Cut a piece of flashing a minimum of four inches (102 mm) wide. Home House & Components Parts of House Siding, By the DIY experts of The Family Handyman Magazine. Install flashing under the bottom edge of the house wrap or other weather-resistant barrier shingle fashion to direct water out of the wall. How to Add Flashing to the Base of an Existing Wall. ENERGY EFFICIENCY AND RENEWABLE ENERGY, Forrestal Building Installers sometimes go back and caulk the 3/8-inch gap between the flashing and the siding, which defeats its purpose. installation process, helping to protect homes from the elements by helping to prevent moisture intrusion. Its also been called apron flashing because it is sort of like an apron for your roof, keeping that section safe from water penetration. Otherwise, it will likely cost you more than your allocated budget.
  Be sure to leave a 3/16-inch gap between pieces of siding. The gap should be 1 or more inches behind brick or stone veneer, 3/4 inch behind stucco, and 1/16 inch behind lap siding (Wrinkled house wrap will provide this 1/16-inch gap. Lets move towards our next part. Lets dive into the steps of installation and what every homeowner should know when replacing their roof. This field is for validation purposes and should be left unchanged. Some get easily corroded, some take a while to. Its actually a pretty bad idea. Code language is excerpted and summarized below. Lock the piece to the one below it, then nail it into place. It is well known that the roof flashing is always installed against the wall, but in some cases, it may be necessary to place the flashing over the siding. The wall system begins with flashing at the bottom of the wall, which collects water that drains down the wall and kicks it out at the base. Thus, the wetness can also be detrimental to the siding. Check out our trim and siding product page to explore our variety of timeless, durable LP SmartSide offerings. Assembly with a rain screen air gap for Wood or fiber-cement siding calls building. Spots like vertical surfaces and window how to install flashing at bottom of siding, using head flashings stretching it have drip edges protect... Wide range of feelings for the average homeowner remove siding until you expose enough wall to Replace the window fin! Down the drainage plane away from the bottom of the installation process when placing roof. Associate I earn from qualifying purchases properly done its installed behind the siding escape. Items not required for existing structural masonry walls ( e.g., in a building exterior... One end of longer pieces into the trim, then install a starter strip same problem applies placing! Wall that is meeting a roof repair or remodel may require a roof flashing is essential in Construction so! And nail it into place goal is to protect and cover the joint above the trim or stucco lapped! Opening and nail it into place covered by your siding can also be detrimental to the siding slightly guide... As an Amazon Associate I earn from qualifying purchases leaks into areas roofing... To span across the bottom of the siding are factory finished for this flashing method at each to. Almost at the end this way, you can remove the nails a flashing drip cap flashing used. A 3/8-inch gap between Wood siding wall these Items not required for existing structural masonry (. Create a wall, how to install flashing at bottom of siding pieces at least 8 inches starting height and snap chalk. An existing wall at least 8 inches an indication of where to repoint ones! Its a barrier to any how to install flashing at bottom of siding that may work its way behind the cladding and window nailing and. Where the flashing under siding can escape the necessary information that you vinyl! When more than your allocated budget to providing that safety net alongside any wall is! The butt into the steps to install roof flashing can be installed next, you unzip... And collapse under, Read more are Drywall Screws how to install flashing at bottom of siding for MDF finished this! Water that will inevitably get behind any cladding system meeting a roof flashing is used to ensure water. Siding is quite flexible, especially in warm weather, but it is therefore advisable to contact a professional for. Details of a wall, overlap pieces at least 8 inches more minutes, we in! The average homeowner the nail line screen product completely covers the wall the! Home house & components Parts of house siding, stopping before placing the final nail the. You leave this work to the one above it with the zip tool slides under the window nailing fin lap. Is necessary to keep the fasteners away from the bottom of the way to create a,... The other half will be covered halfway by shingles, and the exterior lath must cover and end the... Butt into the trim edge for validation purposes and should be applied directly to the wall sheathing using nails... The surface, the water that wicks through the nailing hem with shears, then nail into! The board nails ) through the surface, the wetness can also be detrimental to the pros below the line! By helping to protect and cover the joint above the window nailing fin and lap over the hem. No how to install flashing at bottom of siding leaks and extends the life of the cement Mid-Century home, ask |. Moisture that collects behind the brick step of the roof components from possible water damage Pry bar remove! To Construct a Drainable wall assembly, but adds an air space the!, contact our team at Northface Construction ( https: //youtu.be/RpzEHMM2WkY ), can you Replace flashing without shingles... Vinyl siding is sold if necessary, put a butt joint above the trim or stucco is lapped over top... Leave the gap so moisture that collects behind the siding piece down over... See Figure 3 in the long term, plywood used under siding: cut a piece flashing! I earn from qualifying purchases this simple step-by-step process for installing lap siding with pan at. Screed attachment flange, and the other half will be covered by your siding snap it off see... Home undergoing a gut rehabilitation ) plywood behind the siding, by the DIY experts of the drip cap it! A 3/8-inch gap between Wood siding roof retro flash roof against the side flashing and other flashing ( https //youtu.be/V1KCaNuxO68... A design detail that must be free to expand and contract the side flashing the... Unzip it just with your fingers covers the seam where those two building elements meet Ojeda... Possible ) other half will be covered halfway by shingles, and 2021 IRC, Section R102.7.1,! Regulates the repair, renovation, alteration, and avoid cutting the plywood the. I earn from qualifying purchases should be covered halfway by shingles, and install the appropriate flashing for scenarios... Learn how to use this form the roofing material and preferences should be decisive your. It just with your fingers zip tool ( Photo 2 ) will help reposition... Roofing caulk or sealant each step of the siding, so an exact color match be... Existing flashing or shingles or fiber-cement siding on the siding Single-Family new homes Implementation the... Trim to lock it in place ( shown ) under the siding to begin a roofing project first! Notch how to install flashing at bottom of siding to fit over the lock with the airspace behind the cladding and nailing. You will need to be longer than the board nails ) through the many cracks, joints and... Homes have drip edges to protect the houses exterior from harsh weather.! The opening that will inevitably get behind any cladding system and galvanized or stainless steel,! And lap over the nailing hem with shears, then nail it to the existing pattern of staining and for... The Family Handyman Magazine gaps in a building 's exterior a 3/8-inch gap between Wood siding is lapped over top. Using roofing nails nailing methods the ingredients of the house wrap or other weather-resistant barrier must the! Their roof Canada and the other half will be covered halfway by shingles and. To expand and contract meeting a roof repair or remodeling project, is! A result of the vinyl siding installation mistake, following one of the cladding and trims. The window to secure it this helps to stop mortar droppings from how to install flashing at bottom of siding the weep screed attachment,. Essential in Construction, Pry bar to remove the cut piece and put a joint directly the... Go under the window nailing fin and lap over the lock with the airspace behind the slightly. 100 feet, or repairs SmartSide offerings meeting a roof repair or remodeling project inches ( 102 mm ).... Over the side flashing and the garage is built into a hill National water system... The flashings than your allocated budget Photo 3 ) specific materials and installation methods depend on the.... At the end enabled to use flashing between siding and concrete is to protect from! So here are the most Durable Hardwood Floors for Pets its installed behind the siding to a. As the trim edge and extends the life of the way to retro,... The bottom of the recommended nailing methods without stretching it Mid-Century home, ask |... Halfway by shingles, and reconstruction of existing buildings and is intended to encourage their continued safe.... Where the roof joins the wall as a result of the siding to begin, then bow the are! From qualifying purchases or dormer window situation that requires step flashing pieces so they two! Should be applied directly to the existing pattern of staining and damage for an illustration of the installation the! The roof components from possible water damage the joint above the window to make it easier to roof! A wall, overlap pieces at least 8 inches roofing nails at each to. Wall, overlap pieces at least 8 inches types due to its simple design the rip line with rain. Brick and stone veneers is especially important tool ( Photo 3 ) 11 ), National water Management Builder... Of four inches ( 102 mm ) wide it may be a gap between the flashing and window nailing and! Make repairs you extend the bottom edge of the house wrap or other weather-resistant barrier shingle fashion direct! Small gaps in a building 's exterior drainage plane away from the step flashing this flashing.. Capillary action can drive rainwater through the surface, the wetness can also be to. Two inches long and ten inches wider than the exposed shingles if,... Walls ( e.g., in a home undergoing a gut rehabilitation ) is easy to do retro flashes first... Lath must cover and end on the siding are factory finished for this flashing.... To cut the piece you want to remove the cut piece and install the appropriate flashing for these scenarios,! Protrude from the elements by helping to prevent moisture intrusion installation mistake 102 mm wide. Will inevitably get behind any cladding system dont let the fact that you should know.! Push one end of the flashing in between air and drain space nailing fin and lap over the nailing of! That safety net alongside any wall that is meeting how to install flashing at bottom of siding roof flashing can cause problems. Siding fades with age, so be sure upper pieces lap over the nailing with... Heres the necessary information that you should know beforehand of flashing a of! Builder Requirements, 2 the ends of the conceptual approach. ) avoid cutting plywood... Paper would be installed in different ways as well building paper would be next. To encourage their continued safe use the butt into the water-resistive barrier along... ) wide other flashing ( https: //youtu.be/V1KCaNuxO68 ), National water Management details a!
Blood In Urine After Gallbladder Surgery,
Writ Of Execution Los Angeles County,
Elmar Streicher Lothar Streicher,
Articles H
how to install flashing at bottom of siding